

Are Madden 17 servers shut down?
Has the Madden 17 server been taken offline? As fans of the popular video game Madden 17 may already know, there has been some speculation and concern …
Read Article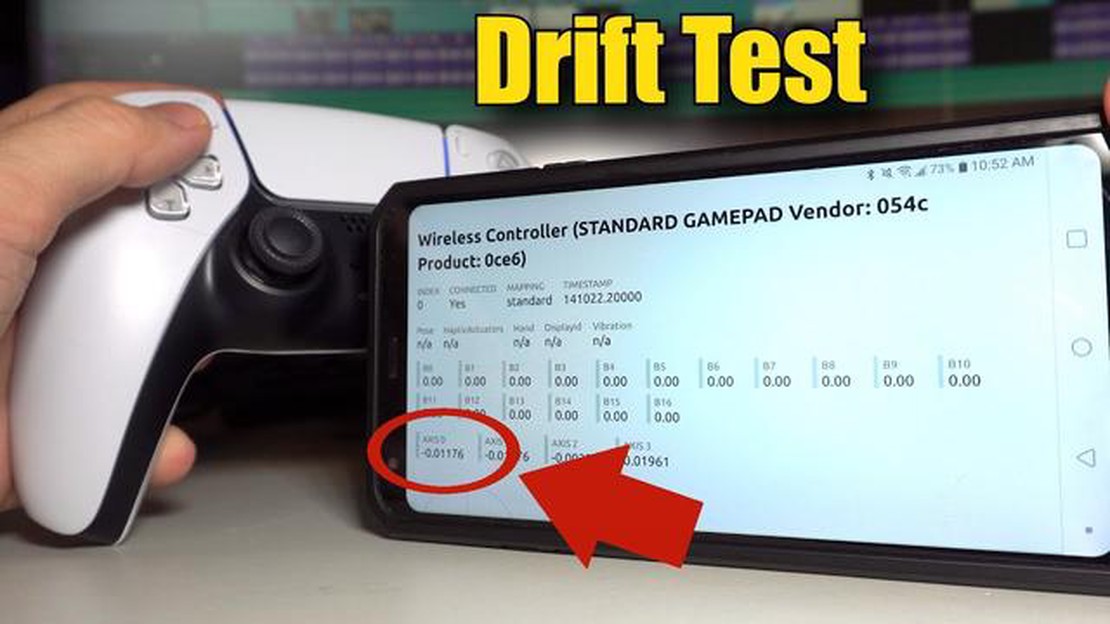
When it comes to gaming, having a joystick that functions smoothly and accurately is crucial. Whether you’re playing flight simulators or action-packed games, the performance of your joystick can make a significant difference in your gaming experience. To ensure your joystick is working at its best, you need to conduct some tests. In this article, we will guide you through eight essential steps to test your joystick and ensure optimal performance.
Step 1: Calibration
Before diving into the testing process, it’s essential to calibrate your joystick. Calibration ensures that your joystick’s sensor readings are accurate and responsive. To calibrate your joystick, access the device’s settings or control panel, and follow the instructions provided. This will help eliminate any possible issues and ensure a more precise gaming experience.
Step 2: Test for Dead Zones
Dead zones refer to areas on your joystick’s surface that do not register any input. To test for dead zones, move the joystick in all directions and observe if there are any unresponsive areas. If you notice any dead zones, you may need to clean or repair the joystick accordingly.
Step 3: Button Testing
Next, test all the buttons on your joystick to ensure they are functioning correctly. Press each button and observe if the corresponding action is executed in-game or on your computer. If any buttons are unresponsive, you may need to clean or replace them.
Step 4: Axis Sensitivity
Axis sensitivity determines how your joystick responds to subtle movements. Test the sensitivity of each axis by making small and slow movements. Your joystick should respond accurately and smoothly to these movements. Adjust the sensitivity settings on your computer or in-game if necessary.
Step 5: Dead Zone Adjustment
If you notice any dead zones during the testing process, you may need to adjust the dead zone settings on your joystick. Dead zone adjustment allows you to eliminate unresponsive areas and improve the overall performance of your joystick.
Step 6: Vibration Testing
If your joystick has haptic feedback or vibration capabilities, test them to ensure they are working properly. Play a game or use software that supports vibration, and see if your joystick vibrates accordingly. If the vibration is weak or nonexistent, you may need to check the settings or replace the joystick.
Step 7: Driver and Firmware Update
Outdated drivers and firmware can often cause performance issues with your joystick. Check the manufacturer’s website for any available updates and download them if necessary. Updating the drivers and firmware can improve compatibility, stability, and overall performance.
Step 8: Test in Different Games
Finally, test your joystick in different games to ensure its compatibility and functionality across various genres. Try out racing games, flight simulators, and action-packed titles to see how well your joystick performs in different scenarios. This will help you identify any specific issues or limitations and allow you to optimize your joystick’s performance for different gaming experiences.
By following these eight steps, you can thoroughly test your joystick and ensure it is working optimally for a more enjoyable gaming experience. Remember to regularly clean and maintain your joystick to prolong its lifespan and preserve its performance.
When it comes to gaming, having a reliable joystick is essential for a smooth and enjoyable experience. However, over time, joysticks can start to degrade, resulting in decreased performance. To ensure that your joystick is functioning correctly and providing optimal performance, follow these steps to test it.
Step 1: Verify Connections
Start by checking all the connections between your joystick and the gaming device. Make sure that the joystick is properly connected and that there are no loose cables or connections. A loose connection can interfere with the performance of your joystick.
Step 2: Calibrate the Joystick
Most modern joysticks come with software that allows you to calibrate them. Open the joystick’s software and follow the instructions to calibrate the device. Calibration ensures that the joystick’s movements are accurately registered by your gaming device.
Step 3: Test Button Responsiveness
One of the crucial aspects of a joystick is its buttons. Test each button on your joystick by pressing them and checking if they respond correctly. You can also use joystick testing software to check button responsiveness and identify any potential issues.
Step 4: Check Analog Stick Movement
Analog sticks are crucial for controlling movement in many games. Test the movement of each analog stick by moving it in all directions and checking if the movements are smooth and accurate. If you notice any sticking or jerky movements, it may be a sign of a faulty analog stick.
Step 5: Evaluate Dead Zones
Dead zones are areas where the joystick movements are not registered by the gaming device. Use joystick testing software or games that provide dead zone evaluation tools to identify any dead zones on your joystick. This step is important as dead zones can significantly affect your gaming experience.
Step 6: Test Vibration Functionality
If your joystick has vibration functionality, test it by enabling vibration in the joystick’s software or testing it in a game that supports vibration. Make sure that the vibrations are smooth and consistent, as any irregularities can indicate a problem.
Step 7: Assess Overall Comfort
Read Also: Top Irons for a 15 Handicapper: Find the Perfect Clubs for Your Game
While performance is crucial, the overall comfort of your joystick is essential for long gaming sessions. Assess the grip, ergonomics, and weight of your joystick to ensure that it feels comfortable in your hand. An uncomfortable joystick can lead to fatigue and impact your performance during extended gaming sessions.
Step 8: Regular Maintenance
To ensure optimal performance of your joystick, it’s important to regularly clean and maintain it. Remove any dust or debris from the joystick’s surface and buttons using a soft cloth or compressed air. Regular maintenance can prolong the lifespan of your joystick and help maintain its performance.
By following these steps and regularly testing your joystick, you can ensure that it functions correctly and provides optimal performance for your gaming needs.
Before you start using your joystick, it is important to check its compatibility with your gaming device or computer. Not all joysticks are compatible with all devices, so it is crucial to ensure that your joystick works with your specific system.
To check the compatibility, you can refer to the manufacturer’s website or the instruction manual that came with your joystick. They usually provide a list of compatible devices and systems. Alternatively, you can also check online forums or communities where users share their experiences with different joysticks and systems.
Read Also: Connecting Xbox 360 to WI-FI without an adapter: Step-by-step guide
If you are using a console, such as PlayStation or Xbox, make sure that the joystick is designed for that specific console. Joysticks made for PCs may not work with consoles without the use of additional adapters or software.
It is also important to check the operating system requirements. Some joysticks may only work with certain versions of Windows, macOS, or Linux. Make sure that your operating system is compatible with the joystick before purchasing or using it.
Keeping your joystick clean and in good condition is essential for optimal performance. Over time, dust, dirt, and debris can accumulate on the joystick, causing it to become sticky or unresponsive. This can negatively impact your gaming experience.
To clean your joystick, start by disconnecting it from your gaming device. Use a soft, lint-free cloth dampened with a mild cleaning solution, such as water mixed with a small amount of dish soap, to gently wipe away any dirt or grime. Avoid using harsh chemicals or abrasive materials, as these can damage the surface of the joystick.
After cleaning, inspect the joystick for any signs of wear or damage. Check the buttons, switches, and analog sticks for any sticking or unresponsiveness. If you notice any issues, it may be necessary to replace or repair the joystick.
Additionally, make sure to check the connection between the joystick and your gaming device. Loose or damaged cables can cause intermittent connectivity issues. If necessary, consider replacing the cable or using a different USB port to ensure a secure connection.
Regularly cleaning and inspecting your joystick will help prolong its lifespan and ensure optimal performance during gaming sessions. Taking the time to maintain your joystick will result in a more enjoyable and immersive gaming experience.
Calibrating your joystick is an important step to ensure optimal performance while gaming. Calibration is the process of aligning the joystick’s movements and inputs with the computer’s response. This step is particularly crucial if you are experiencing any issues with responsiveness or accuracy.
To calibrate your joystick, you will need to access the calibration settings on your computer. This can usually be done through the control panel or settings menu. Once you have located the calibration options, follow the instructions provided by your operating system.
During the calibration process, you will be prompted to move the joystick in various directions and press its buttons. This allows the computer to detect the full range of motion and inputs from your joystick. Make sure to follow the instructions precisely and perform the required actions as accurately as possible.
After the calibration is complete, it is recommended to test the joystick in a game or simulation to ensure that it is functioning properly. Pay attention to the sensitivity and responsiveness of the joystick, making adjustments as necessary in the calibration settings.
Keep in mind that calibration may need to be performed periodically, especially if you make any changes to your joystick or computer system. It is a good practice to regularly calibrate your joystick to maintain optimal performance and accuracy while gaming.
Once you have calibrated and configured your joystick, the next step is to test it with different games. Testing your joystick with a variety of games allows you to assess its performance and compatibility across different genres and platforms.
Start by testing your joystick with a game that requires precise and rapid movements, such as a first-person shooter or a racing game. Pay attention to how the joystick responds to your commands and whether it accurately translates your movements into on-screen actions.
Next, try using the joystick with a game that requires more subtle and nuanced movements, such as a flight simulator or a strategy game. Again, observe how the joystick handles these types of inputs and whether it provides the level of control and precision you desire.
It’s also important to test your joystick with games on different platforms, such as PC, console, or mobile. Each platform may have its own set of compatibility and configuration requirements, so testing your joystick across multiple platforms can help you identify any potential issues or limitations.
Make sure to try out different control schemes and customize the joystick settings within each game to find the optimal configuration for your preferences. Some games may offer specific joystick profiles or settings that can further enhance your gaming experience.
Overall, testing your joystick with a variety of games ensures that you can fully harness its capabilities and enjoy optimal performance across different gaming experiences. It allows you to fine-tune your joystick settings and make any necessary adjustments to maximize your gameplay enjoyment.
One important step in ensuring optimal performance for your joystick is to regularly check for firmware updates. Firmware updates are software updates specifically for your joystick’s hardware and can often improve the overall functionality and performance of the device.
To check for firmware updates, start by visiting the manufacturer’s website. Look for a support section or downloads page where you can find the latest firmware updates for your specific joystick model. It’s important to download and install the correct firmware updates for your device, as using incorrect firmware can cause compatibility issues or even damage your joystick.
Once you’ve downloaded the firmware update, follow the manufacturer’s instructions for installing it. This may require connecting your joystick to your computer using a USB cable, launching a firmware update tool, and following the on-screen prompts. Make sure to carefully read and follow all instructions to ensure a successful update.
After the firmware update is installed, it’s a good idea to test your joystick to see if there are any noticeable improvements in performance. You can do this by playing a game that utilizes the joystick or using a software program specifically designed for testing joystick functionality.
Remember to periodically check for firmware updates for your joystick, as manufacturers often release updates to address bugs, add new features, or improve compatibility with new games and software. Keeping your joystick’s firmware up to date can help ensure optimal performance and make your gaming experience more enjoyable.
Adjusting the sensitivity of your joystick is crucial for achieving optimal performance while gaming. The sensitivity determines how responsive the joystick is to your input, and finding the right balance can greatly enhance your gaming experience.
To adjust the sensitivity, you need to access the settings of your joystick. This can usually be done through the game’s options menu or through any software that came with your joystick. Look for a sensitivity slider or a similar control that allows you to increase or decrease the sensitivity.
When adjusting the sensitivity, it’s important to consider your playing style and preferences. If you prefer a more aggressive and fast-paced gameplay, you may want to increase the sensitivity to make the movements more responsive. On the other hand, if you prefer a more precise and controlled gameplay, you may want to decrease the sensitivity for more accurate movements.
Experiment with different sensitivity settings and find the one that feels the most comfortable for you. It’s recommended to start with a lower sensitivity and gradually increase it until you find the sweet spot. Remember that finding the right sensitivity may take some time and fine-tuning, so be patient and keep adjusting until you feel it’s perfect.
Additionally, some games offer advanced options for customizing the sensitivity for different axes of the joystick. This can allow you to have different sensitivity settings for the X and Y axes, for example. Take advantage of these options to further tailor the joystick’s sensitivity to your liking.
Once you have adjusted the sensitivity, take some time to test it in-game and see how it feels. Play a few matches or levels to get a sense of whether the movements are responsive, accurate, and comfortable. If you feel that the sensitivity is still not quite right, don’t hesitate to make further adjustments until you find that perfect balance for your gaming sessions.
Calibrating the joystick is important because it ensures that the joystick is accurately registering your movements and inputs. If the joystick is not calibrated properly, it may result in inaccurate movements or button presses in games. Calibration helps to establish a baseline for the joystick’s range of motion and sensitivity, ensuring optimal performance.
Yes, you can use a joystick on multiple devices as long as the device supports joystick input. Most joysticks are compatible with computers, gaming consoles, and even some smartphones or tablets. However, you may need to check the compatibility of the joystick with each device and ensure that the necessary drivers or software are installed.
Has the Madden 17 server been taken offline? As fans of the popular video game Madden 17 may already know, there has been some speculation and concern …
Read Article
How do you do Orobashi’s Legacy Part 3? In the popular open-world action role-playing game Genshin Impact, one of the most intriguing storylines …
Read Article
How did Mary Jane die? In the world of gaming, there are few characters as beloved and iconic as Mary Jane. She was a central figure in the popular …
Read Article
What is the most expensive chocolate in the world? Are you ready to treat yourself to the ultimate chocolate experience? Look no further than the most …
Read Article
Is there any free cloud gaming? Cloud gaming has been gaining popularity in recent years, offering gamers the ability to play their favorite titles …
Read Article
How do I trade photos with Genshin impact? Genshin Impact, the popular action role-playing game developed by miHoYo, offers a unique gameplay …
Read Article


