


Can You Trace a Gmail Account?
Can you trace a Gmail account? In today’s digital age, people are becoming increasingly reliant on email as a means of communication. Gmail, one of …
Read Article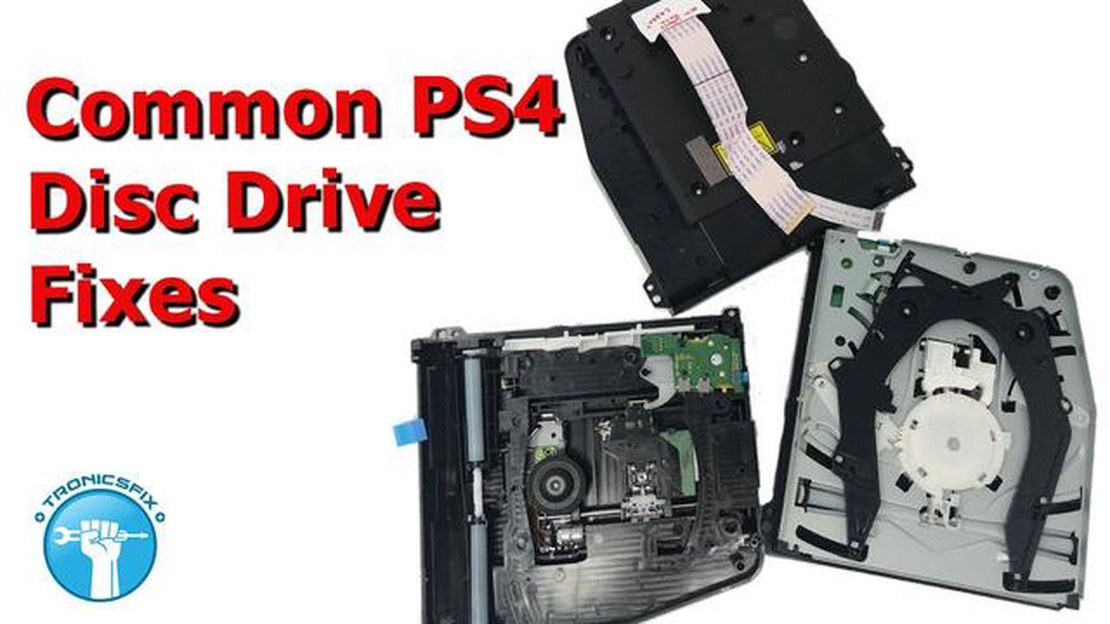
Is your PS4’s CD player not working properly? Don’t worry – repairing it might be easier than you think. In this step-by-step guide, we will walk you through the process of fixing the CD player on your PS4, allowing you to enjoy all your favorite games and movies again.
First, it’s important to understand the common issues that can arise with the CD player on the PS4. One of the most common problems is when the console is unable to read discs or keeps ejecting them. This can be frustrating, especially if you have tried multiple discs and they all have the same issue. Fortunately, there are several potential solutions to these problems.
Before diving into the repair process, it’s essential to gather the necessary tools. You will need a small Phillips head screwdriver, a can of compressed air, and a soft cloth. These tools will help you remove the necessary components and clean any dust or debris that may be causing the CD player to malfunction.
Once you have the tools ready, it’s time to start the repair process. The first step is to power off your PS4 completely and unplug all cables. Then, carefully flip the console over and remove the glossy panel on the bottom to access the CD player. This panel is held in place by a series of small screws, so be sure to keep track of them.
With the panel removed, you can now see the CD player mechanism. Use your compressed air to gently blow away any dust or debris that may have accumulated inside. Be thorough in this step, as even a small amount of dirt can cause issues with the CD player. Once you have cleaned the mechanism, use a soft cloth to wipe away any remaining residue.
After cleaning the CD player, it’s time to reassemble the console. Carefully replace the glossy panel and secure it with the screws. Once the panel is back in place, plug in all cables and power on your PS4. Insert a disc and test the CD player to see if the issue has been resolved. If not, you may need to repeat the cleaning process or consider seeking professional assistance.
By following this step-by-step guide, you can easily fix the CD player of your PS4 and get back to enjoying all your favorite games and movies. Remember to be patient and thorough in the repair process, and don’t hesitate to seek help if needed. With a little effort, your PS4’s CD player will be up and running smoothly again in no time.
If your PS4 CD player is not working properly, there are several common troubleshooting steps you can try before seeking professional help.
1. Check the disc: Make sure the disc you are trying to play is clean and free from scratches. Clean it gently with a microfiber cloth and try again.
2. Restart the console: Sometimes, a simple restart can fix minor software glitches. Turn off your PS4, unplug it from the power source, wait for a few minutes, then plug it back in and turn it on.
3. Update the software: Check for any system software updates and install them if available. These updates often include bug fixes that can improve the performance of the CD player.
4. Clear the cache: Clearing the cache can help resolve temporary issues that may be causing problems with the CD player. Go to Settings, select Storage, then choose System Storage and press Options. From there, select Clear Cache and confirm your selection.
Read Also: Explore the World of Genshin Impact: Uncover the Locations of Crabs
5. Rebuild the database: Rebuilding the database can solve issues with corrupted data that may be affecting the CD player. Go to Settings, then select Initialization, and choose Rebuild Database. Be aware that this process may take some time.
6. Check for hardware issues: If none of the above steps work, there may be a hardware problem with your PS4’s CD player. In this case, it is recommended to contact Sony customer support or take your console to a professional technician for repair.
By following these common troubleshooting steps, you can often resolve issues with your PS4 CD player and get back to enjoying your favorite games and media.
To fix the CD player of your PS4, you will need to disassemble the console. Make sure to follow these steps carefully:
Read Also: Is Super Mario 64 Multiplayer? Discover the Secrets of Cooperative Gameplay!
Following these steps will allow you to disassemble your PS4 and access the CD player for further inspection and repair. Remember to handle all components with care and keep track of the screws and cables you remove to ensure a smooth reassembly process.
If you’re experiencing issues with your PS4’s CD player, there are a few steps you can take to try and fix the problem before seeking professional help. Here’s a step-by-step guide:
Remember, fixing the CD player of your PS4 may require some troubleshooting and patience. Follow these steps carefully, and hopefully, you’ll be able to enjoy your favorite games and movies on disc again.
After fixing the CD player of your PS4, it’s time to reassemble the console and make sure everything is properly put back together. Follow these steps to reassemble your PS4:
Once you have completed these steps, your PS4 should be fully reassembled and ready to use again. Double-check all the connections and screws to make sure everything is properly in place before powering on the console.
If your PS4’s CD player is not working properly, there are a few steps you can take to fix the issue. First, you can try cleaning the CD player with a soft cloth to remove any dust or debris that may be causing the problem. If that doesn’t work, you can try resetting your PS4 by turning it off and unplugging it for a few minutes. If the issue still persists, you may need to contact Sony support for further assistance or consider getting the CD player repaired or replaced.
While it is possible to fix the CD player of your PS4 yourself, it is not recommended unless you have experience with electronics or console repairs. The CD player is a delicate component and attempting to fix it without proper knowledge or tools can potentially cause further damage. It is generally best to contact Sony support or a professional repair service to get the CD player fixed.
The time it takes to fix the CD player of a PS4 can vary depending on the specific issue and the repair method used. In some cases, simple troubleshooting steps such as cleaning the CD player or resetting the device can fix the issue within a few minutes. However, if the problem is more complex and requires replacement of parts or professional repairs, it can take several days or even weeks to get the CD player fixed. It is best to contact Sony support or a professional repair service for an accurate assessment of the repair time.
The cost of fixing the CD player of a PS4 can vary depending on the specific issue and the repair method used. If the problem is minor and can be fixed with simple troubleshooting or cleaning, it may not cost anything. However, if the issue requires replacement of parts or professional repairs, the cost can range from $50 to $150 or more. It is best to contact Sony support or a professional repair service for an accurate assessment of the repair cost.
Whether it is better to get the CD player of your PS4 repaired or replaced depends on the specific issue and the cost of the repair or replacement. If the problem is minor and can be fixed at a reasonable cost, repairing the CD player may be the better option. However, if the issue is more complex or the cost of repairs is significantly high, replacing the CD player with a new one may be a more cost-effective solution. It is best to contact Sony support or a professional repair service for an accurate assessment of the repair options.
Can you trace a Gmail account? In today’s digital age, people are becoming increasingly reliant on email as a means of communication. Gmail, one of …
Read Article
What is the strongest alola starter? The Alola region introduced us to three new starter Pokémon - Rowlet, Litten, and Popplio. Each one has its own …
Read Article
How big is League of Legends download 2020? League of Legends is a massively popular online multiplayer game developed by Riot Games. It has attracted …
Read Article
Who are all the 7 gods in Genshin Impact? The world of Genshin Impact is filled with captivating lore and mythology. One of the central aspects of …
Read Article
Is Far Cry 3 multiplayer co-op or does it only offer single-player campaigns? Far Cry 3 is an open-world first-person shooter video game developed by …
Read Article
Is Flamedramon good cyber sleuth? Flamedramon, the fire-breathing digimon, has become a popular choice among cyber sleuths. But is Flamedramon truly a …
Read Article


