


Is it possible to lose 20 kgs in just 3 months?
Can you lose 20 kgs in 3 months? When it comes to weight loss, many people are eager to find quick and effective methods to shed excess pounds. With …
Read Article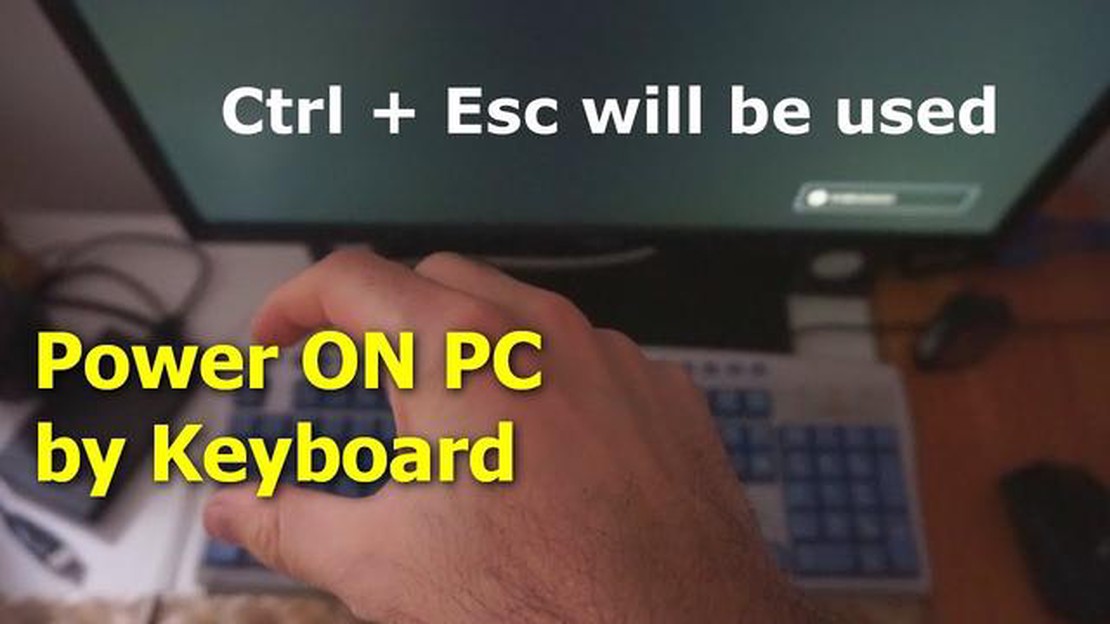
When it comes to using a computer, the keyboard plays a crucial role in inputting commands and typing. However, there are instances where the keyboard may not be immediately activated, especially when using consoles. In this step-by-step guide, we will walk you through the process of activating a computer keyboard for console use, ensuring that you can seamlessly navigate and interact with your computer system.
Step 1: Turn on the Console
The first step in activating a computer keyboard is to turn on the console itself. This may involve pressing the power button or using a remote control, depending on the type of console you are using. Make sure the console is properly connected to a power source and any required peripherals, such as a monitor or TV.
Note: Different console models may have slightly different power-up procedures. Refer to the user manual or manufacturer’s instructions for specific details.
Step 2: Connect the Keyboard
Once the console is powered on, the next step is to connect the keyboard. Locate the USB ports on the console and insert the USB connector of the keyboard into one of the available ports. In some cases, you may need to use an adapter if the console does not have standard USB ports.
TIP: It is recommended to use a wired keyboard for console use, as wireless keyboards may require additional steps for pairing and syncing.
Step 3: Check for Keyboard Recognition
After connecting the keyboard, the console should recognize it automatically. To confirm whether the keyboard is activated, look for any indicators on the console or on the keyboard itself. Some consoles may display a notification or provide an audible signal to indicate successful keyboard recognition.
Step 4: Test the Keyboard
Once the keyboard is recognized, it is important to test its functionality. Open a text editor or any application that accepts keyboard input and try typing on the keyboard. Make sure all the keys are working properly and that the input is registered on the screen. If you encounter any issues, try reconnecting the keyboard or consult the console’s troubleshooting guide.
By following these step-by-step instructions, you can activate a computer keyboard for console use and ensure smooth and efficient interaction with your computer system. Remember to always refer to the specific instructions provided by the console manufacturer for any additional steps or troubleshooting. Now you’re ready to enjoy a seamless keyboard experience on your console!
If you’ve just purchased a new computer or console, you may need to activate the keyboard before you can start using it. Activating a computer keyboard is a simple process that can be done in a few easy steps. In this step-by-step guide, we’ll walk you through the process of activating a computer keyboard.
Step 1: Connect the Keyboard
The first step in activating a computer keyboard is to physically connect it to your computer or console. Most keyboards connect via USB or Bluetooth, so make sure you have the necessary cables or adapters on hand. Plug one end of the cable into the keyboard and the other end into a USB port on your computer or console. If you’re using a wireless keyboard, you’ll need to pair it with your device following the manufacturer’s instructions.
Step 2: Check Device Settings
Once the keyboard is connected, you’ll need to check the device settings to ensure that the keyboard is recognized. Open the settings menu on your computer or console and navigate to the keyboard settings. Here, you should see a list of connected devices. If your keyboard is listed, it means it has been successfully activated.
Step 3: Test the Keyboard
After confirming that the keyboard is recognized, you’ll want to test it to make sure all the keys are functioning properly. Open a text document or a web browser and start typing. Press each key on the keyboard to check if it registers on the screen. If any keys are not working, you may need to troubleshoot or replace the keyboard.
Step 4: Customize Keyboard Settings (Optional)
Once your keyboard is activated and functioning correctly, you may want to customize the settings to suit your preferences. This can include adjusting the key repeat rate, enabling or disabling special functions keys, or modifying the keyboard layout. Refer to your device’s user manual or online resources for instructions on how to customize the keyboard settings.
Read Also: The Unleashed Power of Meliodas: Discovering His Most Powerful Form
By following these step-by-step instructions, you can easily activate a computer keyboard and start using it with your computer or console. Remember to always refer to the user manual or manufacturer’s instructions for specific guidance on activating and customizing your keyboard.
Before activating your computer keyboard on a console, make sure to power on your console. This step is crucial as the keyboard will not function if the console is not turned on. Locate the power button on your console, which is usually located on the front or side panel. Press and hold the power button until you see the console’s power indicator light up.
Read Also: Steps to recover a banned PlayStation Network account
Once the console is powered on, wait for it to fully boot up. This may take a few seconds or minutes, depending on the console model. You can usually tell if the console has booted up completely when you see the console’s logo or home screen displayed on your TV or monitor.
If your console requires an internet connection to activate the keyboard, ensure that it is connected to a stable and active internet connection. This is important as some consoles may require an initial software update or authentication process to enable keyboard functionality. Connect the console to your home Wi-Fi network or use an Ethernet cable to establish a wired internet connection.
Once your console is powered on and connected to the internet, you can proceed to activate the computer keyboard. Refer to the console’s user manual or on-screen instructions to find the specific settings or options that allow you to connect and activate the keyboard. In most cases, you will need to navigate to the system settings or preferences menu and select the keyboard activation option.
To activate a computer keyboard, the first step is to connect it to your computer or console. Depending on the type of keyboard you have, the connection process may vary.
If you have a wired keyboard, you will typically connect it using a USB cable. Look for the USB port on your computer or console and insert the keyboard’s USB cable into it. Make sure to insert it firmly to ensure a stable connection. Once connected, your computer or console should detect the keyboard automatically and it should be ready to use.
If you have a wireless keyboard, you will need to follow a slightly different process. Most wireless keyboards use Bluetooth technology to connect to the computer or console. To activate the keyboard, first, make sure that Bluetooth is enabled on your computer or console. Then, put your keyboard in pairing mode by following the instructions provided by the manufacturer. Once in pairing mode, your computer or console should be able to detect the keyboard. Select the keyboard from the list of available devices and follow any additional on-screen prompts to complete the pairing process.
Some keyboards may require additional software or drivers to be installed on your computer or console for full functionality. If this is the case, check the manufacturer’s website for any necessary downloads and follow the installation instructions.
To activate your computer keyboard, you will need to navigate to the settings menu. The settings menu allows you to access various options and configurations for your computer, including the keyboard settings.
To access the settings menu, you can follow these steps:
Alternatively, if you are using a keyboard shortcut, you can press the “Windows key + I” to directly open the settings menu.
Once you have accessed the keyboard settings, you will be able to configure and activate your computer keyboard according to your preferences. This may involve adjusting the language settings, enabling or disabling certain key functions, or customizing keyboard shortcuts.
In order to activate your computer keyboard, you first need to select the appropriate input device. This is usually done through the settings or preferences menu on your device.
Once you have accessed the input device settings, you will see a list of available devices. This may include options such as keyboards, mice, and game controllers. Select the keyboard option to continue with activating your computer keyboard.
If you are using a wireless keyboard, you may need to pair it with your device before it can be activated. Follow the instructions provided by the manufacturer to complete the pairing process.
For those using a wired keyboard, simply connect the keyboard to the appropriate USB port on your device. The computer should automatically detect the keyboard and activate it for use.
To activate your computer keyboard, you can follow these simple steps:
By following these steps, you should be able to enable your computer keyboard and start using it for all your typing needs.
Yes, you can activate a wireless keyboard without a USB. Wireless keyboards usually connect to the computer using Bluetooth technology. To activate a wireless keyboard without a USB, make sure the keyboard is in pairing mode and follow the on-screen instructions to connect it to your computer. The computer should recognize the keyboard and activate it wirelessly.
Yes, you can activate a keyboard without restarting the computer. In most cases, the computer should automatically recognize and activate a connected keyboard without the need for a restart. However, if the keyboard is not functioning properly after connecting it, restarting the computer may help resolve any software or driver-related issues that are preventing the keyboard from being activated.
Can you lose 20 kgs in 3 months? When it comes to weight loss, many people are eager to find quick and effective methods to shed excess pounds. With …
Read Article
Which Faggio is faster? Are you a fan of the popular scooter game Grand Theft Auto? Have you ever wondered which Faggio scooter model is the fastest? …
Read Article
How do I open the quest menu in Genshin impact? Genshin Impact is an action role-playing game developed and published by miHoYo. The game is set in …
Read Article
Is it possible to stream movies on the Xbox 360 gaming console? When it comes to gaming consoles, the Xbox 360 has always been a fan favorite. Known …
Read Article
How do I fix Genshin Impact crash on startup? Genshin Impact is a popular action role-playing game developed and published by miHoYo. However, like …
Read Article
What is the Chinese name for Genshin Impact and its significance in the gaming industry? Genshin Impact, the popular action role-playing game …
Read Article


