


How to catch Mewtwo in Pokemon Emerald
How can I catch Mewtwo in Pokemon Emerald? Are you ready to catch the legendary and powerful Mewtwo in Pokemon Emerald? This rare and elusive Pokemon …
Read Article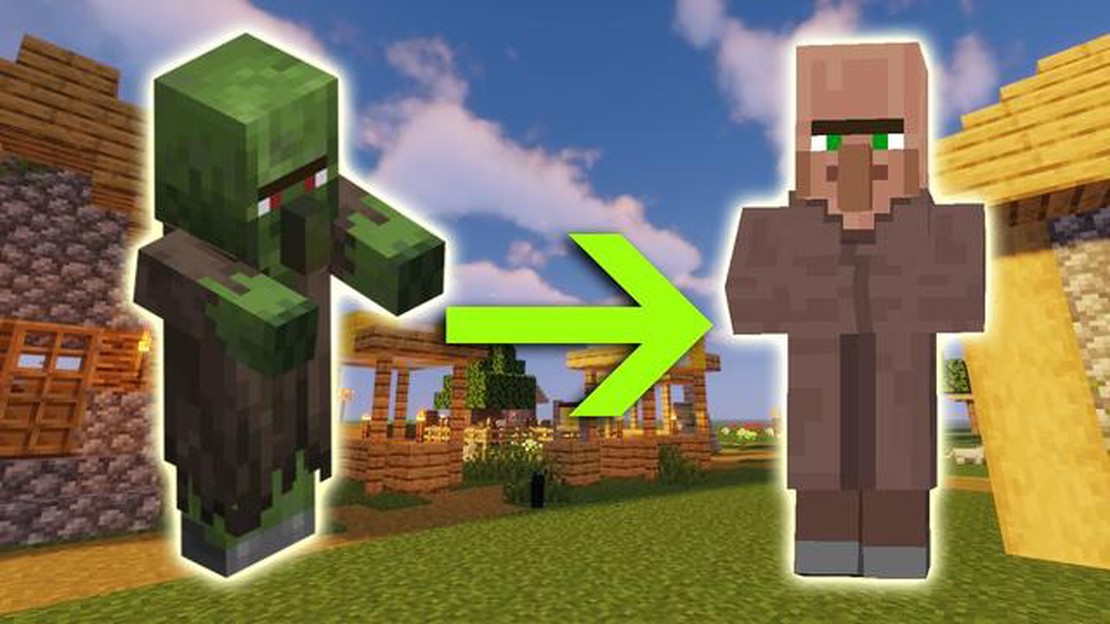
In the world of gaming, zombie villagers can be both a menace and a valuable resource. In this ultimate guide, we will explore the step-by-step process of curing a zombie villager in Minecraft. Whether you’re a seasoned gamer or just starting out, this guide will provide you with all the information you need to successfully cure a zombie villager and restore them to their normal, human form.
First, it’s important to understand why you would want to cure a zombie villager. Cured villagers can offer a wide range of benefits, from trading valuable items and resources to helping you find rare loot. Additionally, they can add a vibrant and lively presence to your Minecraft world, enhancing the overall gameplay experience.
So how exactly do you cure a zombie villager? The process can be broken down into several key steps. First, you’ll need to locate a zombie villager in your Minecraft world. These can often be found roaming around villages or spawning in the dark corners of your world. Once you’ve found a zombie villager, you’ll need to trap them and prevent them from despawning or being killed by other mobs.
Next, you’ll need to gather the necessary materials for the curing process. This includes brewing stands, fermented spider eyes, and golden apples. These materials can be obtained through various means, such as crafting or trading with other villagers. Once you have the materials, you’ll need to brew a Potion of Weakness and use it on the zombie villager.
After applying the Potion of Weakness, you’ll need to wait for a few minutes for the villager to become a regular villager. During this time, it’s important to protect the zombie villager from any harm, as they can still be killed by mobs. Once the transformation is complete, you’ll have successfully cured a zombie villager and gained a valuable ally in your Minecraft world.
In conclusion, curing a zombie villager in Minecraft can be a challenging but rewarding experience. By following the steps outlined in this guide, you can save these once terrifying creatures and transform them into helpful members of your community. So grab your brewing stand and golden apples, and embark on the journey to cure a zombie villager today!
To successfully cure a zombie villager in Minecraft, you first need to be able to identify them. Zombie villagers can be found in villages or created when a villager is attacked by a zombie. They have a distinct appearance, so being able to recognize them is essential.
One of the easiest ways to identify a zombie villager is by their appearance. They have a disheveled look, with tattered clothing and pale, grayish skin. Their eyes are red and they emit a low moaning sound, which is different from the usual sounds of regular villagers. Additionally, they have a more aggressive behavior compared to normal villagers.
Another way to identify a zombie villager is by their behavior. They will actively attack any player or villager they come across, unlike regular villagers who are passive and non-aggressive. Zombie villagers will also be unable to interact with any village-specific structures, such as workstations or beds, unlike normal villagers who use these regularly.
If you are having trouble finding a zombie villager, you can also use the /locate command in Minecraft to locate a village and check for any zombie villagers within it. This can be helpful if you are specifically looking to cure a zombie villager for the purposes of the game.
Knowing how to identify a zombie villager is crucial in order to cure them and restore them back to their original form. By being able to recognize their appearance and behavior, you can successfully undertake the process of turning them back into a regular villager and help your village thrive.
When it comes to identifying a zombie villager, there are several signs of infection to look out for. These signs can help you determine whether a villager has been turned into a zombie or not.
Physical Changes: One of the most obvious signs of infection is a change in the villager’s appearance. Infected villagers may have paler skin, dark circles under their eyes, and a generally gaunt and unhealthy appearance.
Strange Behavior: Infected villagers may display unusual behavior, such as wandering aimlessly, not responding to their surroundings, or attacking other villagers. They may also emit strange noises or growls.
Aggression: Zombie villagers are usually more aggressive than regular villagers. They may try to attack you or other villagers, and they may even chase you if you get too close.
Red Eyes: One telltale sign of infection is the presence of glowing red eyes. If you notice a villager with these red eyes, it is a clear indication that they have been turned into a zombie.
Increased Strength: Infected villagers may exhibit increased strength, which can be seen in their ability to break down doors or other obstacles with ease. This is a result of the zombie virus enhancing their physical abilities.
Inability to Trade: Zombie villagers lose their ability to trade with players. If you try to interact with an infected villager, they will not offer any trade options, further confirming their infection.
Presence of Zombie Villagers: Another sign of infection is the presence of other zombie villagers nearby. Infected villagers tend to congregate in groups, so if you see multiple zombie villagers in the vicinity, it is likely that there are more infected villagers in the area.
By being aware of these signs of infection, you can quickly identify a zombie villager and take the necessary steps to cure them and restore them to their human form.
Read Also: Is Modern Warfare 3 Compatible with PS4?
There are several visual differences between a regular Villager and a Zombie Villager:
These visual differences make it easy to identify a Zombie Villager and distinguish them from regular Villagers. It is important to cure Zombie Villagers as they can be a valuable addition to a village once they are cured.
Zombie villagers can be a formidable enemy in Minecraft, but they can also be cured and turned back into normal villagers. Preparing for the cure is an important step to ensure its success.
Gathering necessary materials: Before attempting to cure a zombie villager, it’s essential to gather all the necessary materials. This includes a golden apple and a splash potion of weakness. These items can be obtained through various means, such as crafting or trading with other villagers.
Building a safe environment: Creating a safe and enclosed area is crucial for the curing process. Zombie villagers are hostile and can cause harm to players. Building a fence or enclosing the area with blocks can prevent other mobs from interfering with the cure.
Isolating the zombie villager: Once you have a safe environment, you need to isolate the zombie villager. This can be done by leading it into a separate area using a lead or by constructing a containment chamber. Isolating the zombie villager will prevent it from being distracted or attacked during the curing process.
Read Also: Unlock the Cheat Code for MX vs ATV Reflex and Boost Your Performance
Applying weakness and feeding the golden apple: With the zombie villager isolated, it’s time to start the curing process. First, you need to throw a splash potion of weakness at the zombie villager. This can be done by right-clicking while holding the potion. After the zombie villager is weakened, you can right-click on it while holding the golden apple to feed it. The golden apple is crucial for the curing process and will start the transformation.
Patience is key: Curing a zombie villager is not an instant process. It can take several minutes for the transformation to take place. During this time, it’s important to protect the zombie villager from any outside threats, such as mobs or environmental hazards. Be patient and wait for the process to complete before interacting with the newly cured villager.
Enjoy the benefits: Once the transformation is complete, you’ll have a brand new villager ready to trade and interact with. Cured villagers can offer valuable items and services, making them a valuable addition to any Minecraft village.
To cure a zombie villager and transform them back into a normal villager, you will need a few key items. Here is a list of the necessary items you will need to gather:
To locate these items, you may need to explore the Minecraft world, search for dungeons, or trade with villagers. Once you have gathered all the necessary items, you will be ready to cure a zombie villager and bring them back to their former life as a normal villager.
Finding a zombie villager is the first step in the process of curing them. These unique creatures can be found in villages or underground dungeons. They are easily recognizable by their green skin and tattered clothes.
To increase your chances of finding a zombie villager, it is recommended to explore villages during the night or in areas with a high concentration of zombies. Additionally, you can try searching for dungeons in caves or abandoned mineshafts, as they often spawn zombie villagers.
When searching for a zombie villager, it is important to be prepared. Make sure you have the necessary equipment, such as weapons and armor, to protect yourself from other hostile mobs. It is also recommended to bring along some healing items, such as potions or golden apples, in case you accidentally get infected by the zombie villager.
Once you have located a zombie villager, you need to capture it without killing it. One effective method is to use a fishing rod or a lead to pull the zombie villager towards you. Alternatively, you can build a trap or create a safe area to contain the zombie villager until you are ready to cure it.
Remember, finding a zombie villager is just the first step in the curing process. Stay tuned for the next steps on how to cure a zombie villager and restore them to their normal, peaceful selves.
The Potion of Weakness is a crucial item in curing a zombie villager in Minecraft. It is a potion that can be brewed using various ingredients and a brewing stand. This potion is essential because it is used to weaken the zombie villager before applying the cure.
To brew the Potion of Weakness, you will need a brewing stand, a bottle of water, and a fermented spider eye. The fermented spider eye is a key ingredient that can be crafted using a spider eye, sugar, and a brown mushroom in a crafting table. Once you have the ingredients, place the bottle of water in one of the slots of the brewing stand and the fermented spider eye in the top slot. Wait for the brewing process to complete, and you will have a Potion of Weakness.
When you have the Potion of Weakness, you need to apply it to the zombie villager. This can be done by throwing a splash potion of weakness at the zombie villager or by using a lingering potion of weakness. The splash potion is a one-time use, while the lingering potion creates an area of effect that lingers in the air for a short period of time. Either way, the zombie villager will be weakened, reducing its health and preventing it from attacking.
Once the zombie villager is weakened, you can proceed to cure it. This is done by using a golden apple on the zombie villager. The golden apple must be a regular golden apple and not a notch apple. Right-click on the weakened zombie villager with the golden apple, and it will begin the process of transformation. After a few minutes, the zombie villager will be cured and become a regular villager once again.
A zombie villager is a hostile mob in the game Minecraft that used to be a regular villager but was turned into a zombie.
Curing a zombie villager can be beneficial because it allows you to restore the villager back to its normal state and keep it as a friendly NPC in your Minecraft world.
There are several ways to find a zombie villager in Minecraft. They can spawn naturally at night, or you can create one by curing a regular villager with a weakness potion and a golden apple.
To cure a zombie villager, you will need a splash potion of weakness and a golden apple. First, throw the splash potion of weakness at the zombie villager, then right-click on it with the golden apple. After a few minutes, the villager will start shaking and transform back into a normal villager.
While curing a zombie villager, it is important to protect it from other hostile mobs, as they may attack and kill it before the transformation is complete. It is also a good idea to have a safe and enclosed area to perform the curing process to prevent any other dangers or interruptions.
How can I catch Mewtwo in Pokemon Emerald? Are you ready to catch the legendary and powerful Mewtwo in Pokemon Emerald? This rare and elusive Pokemon …
Read Article
How do you run and slide in Batman Arkham Knight? If you’re a fan of the Batman Arkham series, then you know how important it is to have a wide range …
Read Article
What is the least expensive car available at Benny’s in GTA V? If you’re a GTA V player on a budget, looking for a stylish ride without breaking the …
Read Article
What is the blue mushroom in Mario? Super Mario is an iconic video game franchise that has captured the hearts of millions of players around the …
Read Article
Is Necrolord good for Frost DK? The Shadowlands expansion for World of Warcraft introduced a new feature called covenants, which players can align …
Read Article
Is Toy Story 3 The Video Game on PS4? Are you a fan of the popular Toy Story franchise and wondering if the Toy Story 3 video game is available on the …
Read Article


