


Can You Share a Netflix Account Between Two Houses?
Can I use Netflix in two different houses? Netflix has become one of the most popular streaming platforms worldwide, offering a wide variety of …
Read Article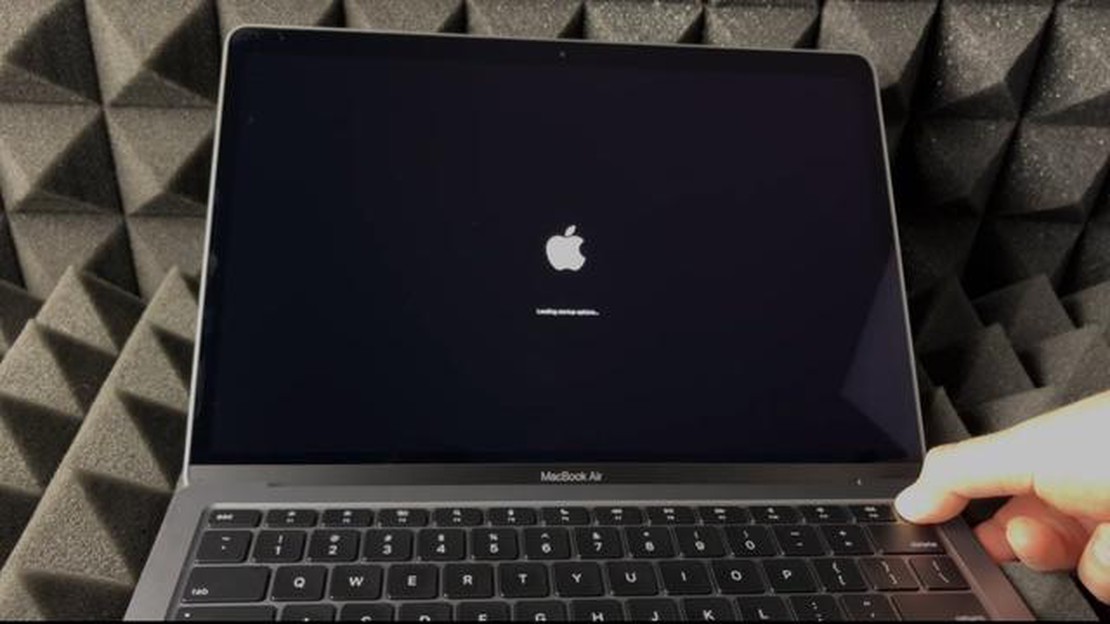
If you’re experiencing issues with your MacBook Air 2021, such as slow performance, frequent crashes, or unresponsive applications, performing a reset can sometimes resolve these problems. Resetting your MacBook Air will erase all personal data and settings, returning it to its original factory state. In this guide, we’ll walk you through the step-by-step process of resetting your MacBook Air 2021.
Step 1: Back up your data
Before you begin the reset process, it’s important to back up any important data or files that you don’t want to lose. You can do this by connecting an external hard drive or using cloud storage services like iCloud or Google Drive. Make sure you have a backup of all your files, as resetting your MacBook Air will delete everything.
Step 2: Sign out of your accounts
Next, sign out of all the accounts associated with your MacBook Air, such as iCloud, iTunes, and any other third-party apps or services. This will ensure that your personal information and data are not accessible after the reset. To do this, go to the Apple menu, select “System Preferences,” then choose the relevant account settings and sign out.
Step 3: Restart your MacBook Air in recovery mode
To initiate the reset process, you’ll need to restart your MacBook Air in recovery mode. First, shut down your MacBook Air completely. Then, press and hold the power button, and as soon as you see the Apple logo, release the power button and immediately press and hold the “Command” and “R” keys together until you see the macOS Utilities window.
Step 4: Erase the hard drive
In the macOS Utilities window, select “Disk Utility” and click “Continue.” From the left sidebar, choose your MacBook Air’s startup disk, usually named “Macintosh HD.” Then, click on the “Erase” tab and select a file system format, such as APFS or Mac OS Extended (Journaled). Finally, click “Erase” to completely wipe the hard drive.
Step 5: Reinstall macOS
Once the hard drive is erased, go back to the macOS Utilities window and select “Reinstall macOS” or “Reinstall OS X,” depending on your version of macOS. Follow the on-screen instructions to reinstall the operating system. This process may take some time, so be patient and make sure your MacBook Air is connected to a power source.
Step 6: Restore your data and settings
After the reinstallation is complete, you can set up your MacBook Air as a new device or restore your data from a backup. If you chose to back up your data in step 1, you can now connect your external hard drive or access your cloud storage and transfer your files back to your MacBook Air. Follow the prompts on the screen to restore your settings and preferences.
Conclusion
Resetting your MacBook Air 2021 can be an effective way to resolve performance issues and restore it to its original factory state. Just remember to back up your data, sign out of your accounts, and follow the step-by-step guide provided. If you’re unsure about performing the reset yourself, it’s always a good idea to consult Apple Support or visit an authorized service provider.
Resetting your MacBook Air 2021 is an important step that can help you resolve various issues and restore your device to its original state. Whether you’re experiencing software glitches, performance issues, or simply want to start fresh, a reset can be a useful solution.
One of the main reasons to reset your MacBook Air 2021 is to fix software problems. Over time, your device may become slow or unresponsive, and certain applications or processes might not work as intended. By resetting your MacBook Air, you can clear out any temporary files, caches, or corrupted data that may be causing these issues.
Another benefit of resetting your MacBook Air is that it can help improve the overall performance of your device. Resetting allows you to remove any unnecessary programs or files that are taking up valuable storage space and slowing down your system. It also gives your device a fresh start, making it more responsive and efficient.
Resetting your MacBook Air can also be beneficial if you plan on selling or giving away your device. By performing a reset, you can ensure that all your personal data, files, and settings are securely erased from the device. This helps protect your privacy and prevents anyone from accessing your sensitive information.
Additionally, resetting your MacBook Air can help you troubleshoot and resolve hardware issues. Sometimes, a reset can fix common hardware problems like a non-functioning keyboard, trackpad, or external ports. It can also help resolve issues with your display or other components.
In conclusion, resetting your MacBook Air 2021 is an important step that can help resolve software issues, improve performance, protect your privacy, and troubleshoot hardware problems. It is a useful tool that can give your device a fresh start and restore it to its optimal functionality.
Before you proceed with resetting your MacBook Air 2021, it is important to back up your data to prevent any loss of important files or information. You can back up your data using various methods, such as using Time Machine or manually copying your files to an external storage device.
Method 1: Using Time Machine
If you have already set up Time Machine on your MacBook Air, it is a convenient way to automatically back up your data. Follow these steps:
Method 2: Manual Backup
If you prefer to manually back up your data, you can do so by copying your files to an external storage device. Follow these steps:
By following these steps, you will ensure that your important data is safely backed up before resetting your MacBook Air 2021.
When it comes to resetting a MacBook Air, it’s crucial to choose the right backup method to ensure that your important files and data are safely stored. There are several backup options available, each with its own advantages and considerations.
Read Also: Reasons why your auto clicker is not working
Time Machine: Using Time Machine is a popular choice for Mac users. This built-in feature allows you to create automatic backups of your entire system, including files, applications, and settings. Time Machine backups are stored on an external hard drive or network storage, providing a convenient way to restore your data after a reset.
iCloud: iCloud backup is another option to consider. This cloud-based service provided by Apple allows you to back up your important files, documents, photos, and settings. iCloud backups are accessible from any device with your Apple ID, making it easy to restore your data without relying on an external storage device.
Read Also: What happens when you collect all 999 moons?
Third-party Backup Solutions: There are also various third-party backup solutions available, such as Carbon Copy Cloner or SuperDuper. These software tools offer additional features and flexibility, allowing you to create customized backups, clone your entire system, or even create bootable backups. However, they may require a one-time purchase or subscription.
It’s important to consider your specific needs and preferences when choosing a backup method. Factors such as storage capacity, ease of use, and accessibility should be taken into account. Additionally, it’s recommended to regularly test your backups to ensure their integrity and reliability.
To reset your MacBook Air, you’ll need to restart it in Recovery Mode. This allows you to access the built-in utilities that can help you reset your device to its factory settings. Here’s how to do it:
1. Shut down your MacBook Air. To do this, click on the Apple menu in the top-left corner of the screen and select “Shut Down”.
2. Press and hold the power button. Keep holding the power button until you see the Apple logo and the loading bar.
3. Release the power button and immediately press and hold the Command (⌘) + R keys. This will boot your MacBook Air into Recovery Mode.
4. Wait for the macOS Utilities window to appear. This may take a few moments, so be patient.
5. Select your language. Click on the “Continue” button and choose your preferred language from the list.
6. Choose Disk Utility from the list of utilities. This will allow you to erase and reformat your MacBook Air’s hard drive.
7. Follow the prompts to erase your hard drive. Make sure to select the appropriate options to erase and reformat your drive securely.
8. Once you’ve erased your hard drive, go back to the macOS Utilities window. Select “Reinstall macOS” and follow the prompts to reinstall the operating system on your MacBook Air.
9. Wait for the reinstallation process to complete. This can take some time, so make sure that your MacBook Air is connected to a power source.
By following these steps, you can reset your MacBook Air in Recovery Mode and start fresh with a clean installation of macOS.
Recovery Mode on the MacBook Air 2021 allows you to troubleshoot various issues with your laptop and restore it to its factory settings if necessary. To access Recovery Mode, follow these steps:
After accessing Recovery Mode, you can utilize various tools and options to troubleshoot issues on your MacBook Air 2021. Some of the options available in Recovery Mode include:
By accessing Recovery Mode on your MacBook Air 2021, you can effectively troubleshoot and resolve various software-related issues, ensuring that your laptop runs smoothly and efficiently.
Once you have backed up all your important data, it’s time to erase your MacBook Air’s drive. This step is crucial as it will remove all your personal information and set your device back to its factory settings. Here’s how you can do it:
By following these steps, you have successfully erased your MacBook Air’s drive and prepared it for the next step in the resetting process. It’s important to note that this step is irreversible, so make sure you have backed up all your important files before proceeding.
When resetting a MacBook Air, it is crucial to select the proper drive for erasure to ensure that all data is permanently removed from the device. To begin this process, you need to access the Disk Utility. You can do this by restarting your MacBook Air and holding down the Command and R keys simultaneously. This will bring up the macOS Utilities screen.
Once you are in the macOS Utilities screen, click on “Disk Utility” and then click the “Continue” button to proceed. In the Disk Utility window, you will see a list of drives and volumes on your MacBook Air.
To erase the main hard drive of your MacBook Air, you will need to select the drive with the highest level in the hierarchy. Typically, this drive will have the manufacturer’s name or “Macintosh HD” as its title. Be careful not to select any external drives or volumes that you want to keep intact.
If you are unsure about which drive to select, you can look for clues such as the size of the drive or the amount of free space it has. Additionally, you can refer to the original documentation or contact Apple Support for assistance.
Once you have identified the correct drive for erasure, click on it to highlight it, and then click on the “Erase” button in the toolbar. A warning message will appear, reminding you that erasing the drive will permanently remove all data. Make sure you have backed up any important files before proceeding.
In the erase menu, you can choose the format for the drive. For most users, the default format is sufficient. However, if you are planning to sell or transfer the MacBook Air, selecting the “Mac OS Extended (Journaled)” format is recommended.
After selecting the format, enter a name for the drive, if desired, and click on the “Erase” button to begin the erasure process. This process may take some time, depending on the size of the drive and the amount of data stored on it.
Once the erasure is complete, you can close the Disk Utility window and proceed with reinstalling macOS or performing any other necessary steps to reset your MacBook Air to its factory settings.
Can I use Netflix in two different houses? Netflix has become one of the most popular streaming platforms worldwide, offering a wide variety of …
Read Article
Is Stormbreaker stronger than Mjolnir? The debate has been raging among Marvel fans ever since the introduction of Stormbreaker in the “Avengers: …
Read Article
How do you farm evil flowers? Are you tired of growing the same old pretty flowers in your virtual garden? Do you want to add a touch of darkness and …
Read Article
Why is Mayweather not in Fight Night Champion? Fight Night Champion is a popular boxing video game that offers players the chance to step into the …
Read Article
How do you get rosehip tart in Ni no Kuni 2? If you’re a fan of the popular video game Ni no Kuni 2 and you’re looking to complete all the game’s …
Read Article
What is the world record for cup stacking 2021? Cup stacking, also known as sport stacking, is a popular competitive activity that involves stacking …
Read Article


