


Choosing the Best NAT Mode for Optimal Gaming Performance
Which NAT mode is best for gaming? Gaming performance is essential to any avid gamer. Achieving the best gaming experience relies on various factors, …
Read Article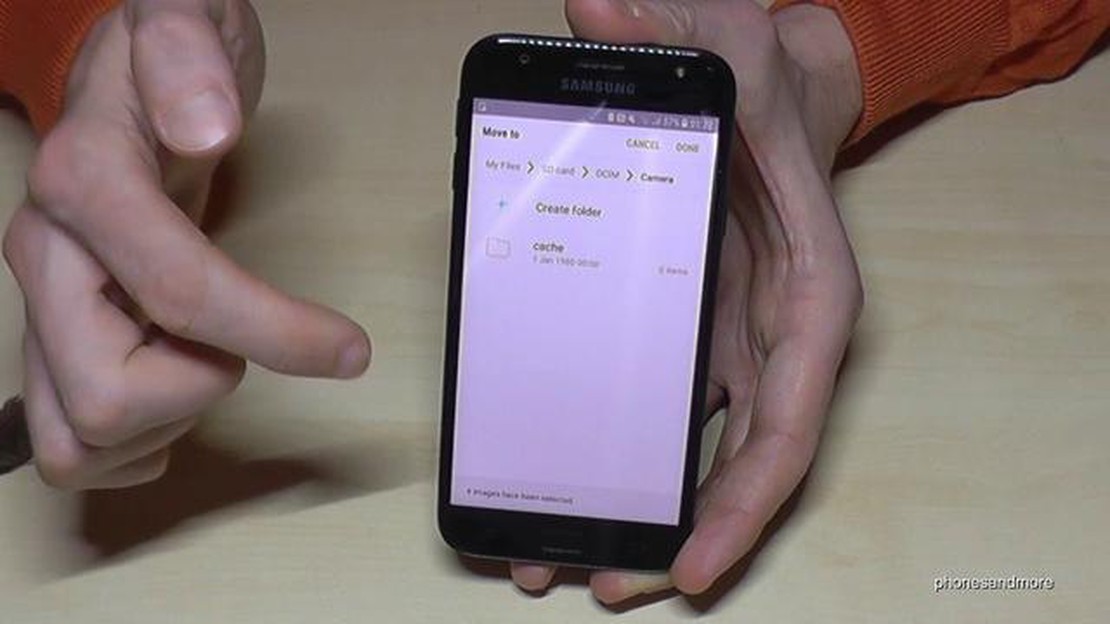
If you have a Samsung J3 2017 smartphone and want to store your files, such as photos, videos, and music, on an SD card, you can easily do so by following these simple steps. Storing your files on an SD card not only helps to free up space on your device but also allows for easy transfer and access of your files across different devices.
Step 1: Insert the SD card
The first step is to insert the SD card into your Samsung J3 2017 smartphone. Locate the SD card slot, which is usually located on the side of the device. Gently insert the SD card into the slot, making sure it is securely inserted.
Step 2: Format the SD card
After inserting the SD card, you will need to format it to work with your Samsung J3 2017 smartphone. To do this, go to the settings menu on your device. Scroll down and tap on the “Storage” option. From there, select the SD card and choose the “Format” option. Follow the on-screen instructions to complete the formatting process.
Step 3: Set the default storage location
Once the SD card is formatted, you can set it as the default storage location for your files. Go back to the settings menu and tap on the “Storage” option again. Scroll down and select the “Default storage location” option. Choose the “SD card” option to set it as the default storage location.
Note: Some apps may not automatically store data on the SD card. In such cases, you may need to manually move the files to the SD card by using a file manager app.
Step 4: Move files to the SD card
To move files to the SD card, open the file manager app on your Samsung J3 2017 smartphone. Navigate to the location of the file you want to move. Long-press on the file to select it, then tap on the “Move” or “Copy” option. Choose the SD card as the destination and confirm the action. The file will now be stored on the SD card.
Following these simple steps, you can easily store your files on the SD card of your Samsung J3 2017 smartphone. Enjoy the benefits of having extra storage space and easy access to your files on various devices!
If you’re running out of storage space on your Samsung J3 2017 phone and want to store your console games on an SD card, follow these simple steps:
By following these simple steps, you can easily store your console games on the SD card of your Samsung J3 2017, freeing up valuable internal storage space and ensuring that you have enough room to download and install new games.
There are several benefits to storing data on a Samsung J3 2017 SD card for consoles. One of the main advantages is the increased storage capacity it provides. With an SD card, you can greatly expand the amount of data that your console can store, allowing you to download and save more games, videos, and other content.
Additionally, using an SD card for storage can help improve the performance of your console. By offloading data to the SD card, you can free up internal storage space on your console, which can lead to faster loading times and smoother gameplay. This is especially beneficial for consoles with limited internal storage.
Another advantage of using an SD card is the convenience it offers. With a larger storage capacity, you don’t have to constantly delete old games or content to make space for new ones. Instead, you can simply transfer files to the SD card, freeing up internal storage without losing any data.
Furthermore, storing data on an SD card makes it easy to take your content with you. Whether you’re traveling or visiting a friend, you can simply remove the SD card from your console and insert it into another compatible device to access your games and files. This portability makes it convenient to enjoy your content on different consoles without the need for constant downloading or transferring.
In conclusion, using a Samsung J3 2017 SD card for console storage offers several benefits, including increased storage capacity, improved console performance, convenience, and portability. Whether you’re a casual gamer or a dedicated gaming enthusiast, using an SD card can greatly enhance your gaming experience.
If you want to increase the storage capacity of your console, inserting and formatting an SD card is a simple and effective solution. By following a few steps, you can easily expand your console’s storage without any hassle.
Step 1: Find the SD Card Slot
First, locate the SD card slot on your console. It is usually located on the side or back of the console, depending on the model. Refer to your console’s user manual for the exact location if you are unsure.
Step 2: Insert the SD Card
Carefully insert the SD card into the slot. Make sure to align the card with the slot properly to avoid any damage. Apply gentle pressure until the card is fully inserted into the slot.
Step 3: Access the Storage Settings
Once the SD card is inserted, navigate to the storage settings on your console. This can usually be found in the system settings or options menu. Look for the option to manage storage or external devices.
Step 4: Format the SD Card
Before you can use the SD card, you will need to format it. Formatting will erase any existing data on the card, so make sure to back up any important files beforehand. Select the option to format the SD card and follow the on-screen instructions.
Read Also: Can I play SMITE on Xbox with mouse and keyboard?
Step 5: Use the SD Card for Storage
Once the formatting process is complete, you can start using the SD card for storage. You can choose to install games, save files, and other data onto the SD card to free up space on your console’s internal storage.
Remember to regularly check the storage settings on your console to monitor the available space on the SD card. If you find that the card is nearing full capacity, you may need to delete or transfer some files to free up space.
In conclusion, inserting and formatting an SD card on your console is a simple process that can greatly expand your storage options. By following these steps, you can easily increase the storage capacity of your console and enjoy more games and media without worrying about running out of space.
If you own a Samsung J3 2017 smartphone and want to store files on the SD card, you’re in luck! This simple guide will walk you through the steps to transfer files to your SD card, whether it be music, photos, videos, or documents.
Step 1: Insert the SD Card
Read Also: Pros and Cons of TDR and STDR in SBI: Which is the Better Option?
Before you can transfer files to your SD card, you need to make sure it is inserted into your Samsung J3 2017 device. Most Samsung J3 2017 smartphones have a slot for an SD card, which you can find on the side of the device. Carefully insert the SD card into the slot until it clicks into place.
Step 2: Locate and Open the Files
Once the SD card is inserted, you need to locate and open the files you want to transfer. This can be done through the file manager app on your Samsung J3 2017 device. Open the app, and navigate to the folder or location where the files are stored.
Step 3: Select and Copy Files
After you have located the files, you need to select and copy them. To do this, tap and hold on a file to select it. Once selected, you can choose the “Copy” option from the menu. Alternatively, you can select multiple files by tapping and holding on one file, and then tapping on the others you want to select.
Step 4: Navigate to SD Card
Once you have copied the files, you need to navigate to the SD card. In the file manager app, you can usually find the SD card listed as an option in the side menu. Tap on the SD card option to navigate to it.
Step 5: Paste Files to SD Card
Once you have navigated to the SD card, you can paste the files you copied earlier. Tap on the “Paste” option in the menu to transfer the files to the SD card. Depending on the size and quantity of the files, this process may take some time.
Step 6: Verify the Transfer
After the files have been transferred, you should verify that the transfer was successful. You can do this by navigating to the SD card again and checking that the files are present. You can also remove the SD card and insert it into another device, such as a console, to ensure that the files are accessible.
Congratulations! You have successfully transferred files to your Samsung J3 2017 SD card. Now you can enjoy your favorite music, photos, videos, and documents on your device or any other compatible device such as a console.
In order to effectively manage storage space on the Samsung J3 2017 SD card, there are several simple steps you can follow.
1. Check Storage Capacity: Start by checking the available storage capacity on your Samsung J3 2017 SD card. This can be done by going to the Settings menu, selecting the Storage option, and then checking the available space on the SD card. This will give you an idea of how much storage space is currently being used and how much is still available.
2. Move Apps to SD Card: If you have apps installed on your Samsung J3 2017 that are taking up a significant amount of storage space, you can move them to the SD card to free up internal storage. To do this, go to the Apps menu in Settings, select the app you want to move, and then tap on the “Move to SD card” option. Not all apps can be moved to the SD card, but moving those that can will help free up space.
3. Transfer Photos and Videos: Another way to free up storage space on your Samsung J3 2017 SD card is to transfer photos and videos to your computer or another storage device. Connect your phone to your computer using a USB cable, and then transfer the files from your phone’s SD card to your computer. Once transferred, you can delete the files from your SD card to create more space.
4. Clear App Caches: Apps on your Samsung J3 2017 SD card can accumulate a significant amount of cache files, which can take up storage space. To clear app caches and free up space, go to the Apps menu in Settings, select the app you want to clear the cache for, and then tap on the “Clear cache” option. Repeat this process for each app to free up more space.
5. Format SD Card: If you have tried all the above steps and are still facing storage space issues, you can consider formatting your Samsung J3 2017 SD card. Formatting will erase all data on the SD card, so make sure to back up any important files before proceeding. To format the SD card, go to the Storage menu in Settings, select the SD card, and then tap on the “Format” option. Follow the on-screen instructions to complete the formatting process.
By following these simple steps, you can effectively manage storage space on the Samsung J3 2017 SD card and ensure that you have enough space for your games and other console data.
If you are experiencing issues with your Samsung J3 2017 SD card on your console, there are several troubleshooting steps you can try to resolve the problem. Here are a few common issues and their potential solutions:
If your console is not recognizing the SD card, first ensure that it is properly inserted into the slot. Sometimes, the card may not be inserted all the way or may have become dislodged. Remove the card and re-insert it firmly to ensure proper connection. If the problem persists, you may need to format the SD card to a compatible file system for your console.
If you are receiving a message indicating insufficient storage on your console, it may be due to the SD card being full or not properly configured. Check the available storage space on your SD card and delete any unnecessary files or apps. Additionally, you may need to set your console to save new data directly to the SD card instead of internal storage.
If your SD card appears to be corrupted or inaccessible, you can try using a computer to reformat the card. Connect the card to a computer using a card reader and open the Disk Management tool. From there, you can format the SD card to a compatible file system. Be aware that formatting will erase all data on the card, so make sure to back up any important files beforehand.
If you are experiencing slow transfer speeds when copying files to or from your SD card, it may be due to the card’s read or write speed. Check the indicated speed class of your SD card and ensure that it meets the minimum requirements for your console. If necessary, consider upgrading to a faster SD card to improve transfer speeds.
By following these troubleshooting steps, you can address common issues with your Samsung J3 2017 SD card on your console. If the problems persist, it may be helpful to reach out to the manufacturer or seek additional technical support.
The Samsung J3 2017 supports micro SD cards with a maximum capacity of 256GB. You can insert a micro SD card with a lower capacity as well, such as 16GB, 32GB, or 64GB, if you don’t need as much storage space.
Which NAT mode is best for gaming? Gaming performance is essential to any avid gamer. Achieving the best gaming experience relies on various factors, …
Read Article
Which class is best in Mass Effect? Mass Effect is a popular science fiction action role-playing game that offers players a wide range of choices when …
Read Article
Can you join a zoom meeting with audio only? If you’re wondering whether it’s possible to join a Zoom meeting with audio only, the answer is yes! Zoom …
Read Article
Who’s the worst singer in BTS? Over the years, BTS has become a global sensation, captivating millions of fans around the world with their mesmerizing …
Read Article
Can Xbox and PC play together GTA 5? GTA 5, an epic open-world game developed by Rockstar Games, has captivated players around the world with its …
Read Article
How do you solve the boat puzzle in Genshin? In the popular action role-playing game Genshin Impact, players often come across challenging puzzles …
Read Article


