


What is the cheapest amount of Robux?
What is the most affordable amount of Robux available? In the world of online gaming, Robux is the digital currency used in the popular game Roblox. …
Read Article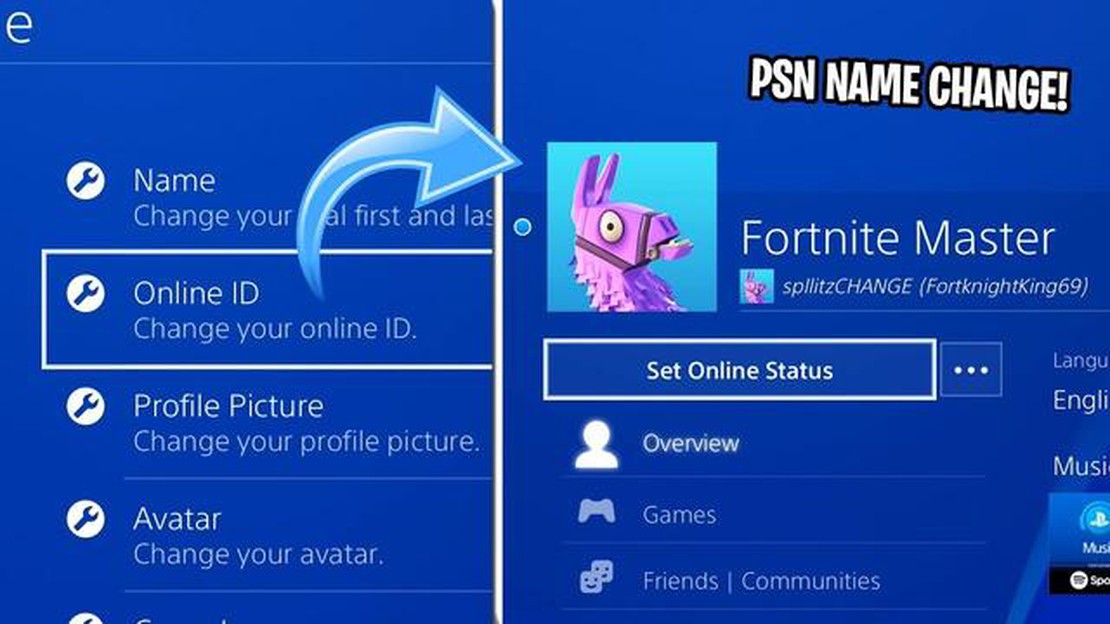
If you’re a PlayStation 4 owner and you’re looking to change your online name, you’re in luck. Sony now allows users to change their PS4 online ID, giving gamers more flexibility in how they present themselves online. Whether you’re tired of your old username or simply want to create a new persona, this step-by-step guide will walk you through the process of changing your name on PS4 consoles.
Step 1: First, make sure you have a stable internet connection and that your PS4 is connected to the internet. Without an internet connection, you won’t be able to access the necessary settings to change your online name.
Step 2: On your PS4 home screen, navigate to the “Settings” option. It should be located in the top row of icons on your screen. Select the “Settings” option by pressing the X button on your controller.
Step 3: Once in the Settings menu, scroll down and select the “Account Management” option. This should be the second option from the bottom of the list. Press the X button on your controller to select it.
Step 4: In the Account Management menu, scroll down to the “Account Information” option and select it. This option will provide you with access to the settings related to your PS4 account.
Step 5: Now that you’re in the Account Information menu, select the “Profile” option. This will take you to your profile settings, where you can change your online name.
Step 6: In the Profile settings menu, select the “Online ID” option. This is where you can change your PS4 online name. Follow the on-screen instructions to choose your new online ID and confirm the change.
Step 7: After confirming your new online ID, you may need to log out of your PS4 account and then log back in for the changes to take effect. Once you’ve done that, you’re all set with your new online name on your PS4 console.
It’s important to note that changing your online ID on PS4 may have some limitations. Some games may not support the feature or may have issues with displaying your new ID. Additionally, you can only change your online ID for free once. If you decide to change it again in the future, there may be a fee associated with the change.
That’s it! You’ve successfully changed your online name on your PS4 console. Now you can enjoy gaming with a fresh identity and show off your new online persona to your friends and fellow gamers.
To start the process of changing your name online on PS4, you first need to access the Settings menu. This is where you can make adjustments to various system settings and preferences on your console.
To access the Settings menu, follow these steps:
By following these steps, you will be able to access the Settings menu on your PS4 and proceed with changing your name online. It’s important to note that changing your name may have certain limitations and restrictions, so make sure to familiarize yourself with the guidelines provided by PlayStation.
Once you have logged into your PS4 console, navigate to the main menu by pressing the home button on your controller.
Using the directional buttons, scroll through the menu options until you find the “Settings” option. Press the X button to select it.
In the Settings menu, locate the “Account Management” option. This option is typically located towards the top of the menu. Press the X button to select it.
Read Also: Which is Better: Miner or Geologist in Stardew Valley?
Within the Account Management menu, you will find various options related to your PS4 account. Use the directional buttons to navigate to the “Account Information” option and press the X button to select it.
In the Account Information menu, you will find information about your PS4 account, including your username and profile picture. Use the directional buttons to navigate to the “Profile” option and press the X button to select it.
Once you are in the Profile menu, you will see the option to change your username. Use the directional buttons to navigate to the “Online ID” option and press the X button to select it.
A confirmation message will appear, informing you that changing your username may affect certain games and applications. Read the message carefully and press the X button to proceed.
From here, you can enter your desired new username. Use the controller’s on-screen keyboard to input the new name. Once you have entered the new username, press the X button to confirm the change.
Once you are logged in to your PS4 console, navigate to the home screen. Look for the PlayStation Network icon, which is represented by a blue sphere with a white “PS” inside. Select this icon to access the PlayStation Network.
Read Also: Who is the strongest hero in MLA?
After accessing the PlayStation Network, scroll down to the “Settings” option. This will take you to a new menu where you can customize various settings related to your PS4 console. Look for the “Account Management” option and select it.
Inside the “Account Management” menu, you will find a list of options. Scroll down until you see the “Account Information” tab and select it. This tab is where you can make changes to your account details, including your online ID.
Within the “Account Information” tab, you will see an option called “Profile” or “Edit Profile”. Select this option to access your profile settings. Here, you can change your online ID, display name, or any other personal information you wish to update.
Once you have made the desired changes to your account information, be sure to save your changes before exiting the menu. This will ensure that your new online ID is applied correctly.
To change your online ID on PS4, you will need to navigate to the Online ID option in the console settings. Here’s how:
By following these steps, you will now be in the “Online ID” menu, where you can change your PS4 online ID. Keep in mind that changing your online ID is subject to Sony’s terms and policies, and some restrictions may apply.
After selecting your desired new online ID on your PS4 console, you will need to enter and confirm it. Here’s how:
It is important to note that once you confirm your new online ID, you will not be able to change it again for free. Additional charges may apply if you decide to change your online ID in the future.
If your new online ID has been successfully entered and confirmed, you will see a notification confirming the change on your screen. Your new online ID will now be displayed in online multiplayer games, leaderboards, and other online features on your PS4 console.
Remember, your new online ID should abide by the PS4 community guidelines and terms of service. Make sure to choose an online ID that respects the rights of others and does not violate any rules or regulations set by Sony Interactive Entertainment.
Yes, you can change your PS4 online name directly from your console. You just need to go to the settings menu, select “Account Management,” then “Account Information,” and finally “Profile” and “Online ID.”
Yes, there is a limit to how many times you can change your online name on PS4. The first change is free, but subsequent changes will cost a fee. The fee amount depends on your PlayStation Plus subscription, with PlayStation Plus members receiving a discounted price for name changes.
Before changing your online name on PS4, you should consider a few things. First, changing your name will also affect your online ID on other PlayStation systems and games. Some games may also experience issues with your online ID change. Additionally, if you have a PlayStation Plus subscription, you should check how name changes will affect your subscription benefits.
No, once you change your online name on PS4, you will not be able to revert back to your old name. However, you can choose to display your old name alongside your new name for 30 days to help your friends recognize your new online ID.
What is the most affordable amount of Robux available? In the world of online gaming, Robux is the digital currency used in the popular game Roblox. …
Read Article
Exploring the Psychological Profile of Batman: Is He a Psychopath or Sociopath? When it comes to psychological disorders, Batman is often a subject of …
Read Article
Is Avocado considered a nightshade vegetable? Examining the classification of avocados in the nightshade family Avocado, a popular fruit known for its …
Read Article
What is an aim email account? An AIM email account refers to an email account associated with AIM, which stands for AOL Instant Messenger. AIM is one …
Read Article
Can you get Triss to help at Kaer Morhen without romancing her? The Witcher 3: Wild Hunt is a critically acclaimed role-playing game that offers …
Read Article
How many members does Benny’s Adventure Team have? Benny’s Adventure Team is a popular group of adventurers in the world of Genshin Impact. Known for …
Read Article


