


Is Blast Effective in Iceborne?
Is Blast good in Iceborne? In the world of Monster Hunter: Iceborne, one of the most debated topics among players is the effectiveness of the blast …
Read Article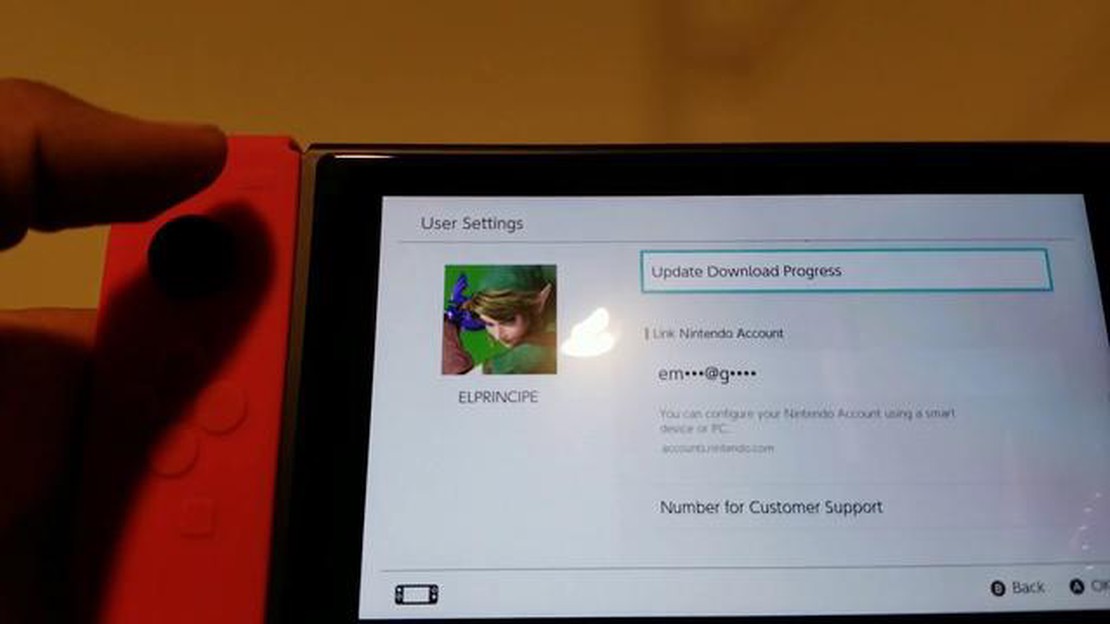
Switching accounts on your Nintendo Switch console is a straight-forward process that can be done in just a few steps. Whether you want to change to a different user account or create a new one, this guide will walk you through the process to ensure a seamless transition.
First, start by accessing the home menu on your Nintendo Switch console by pressing the home button on your controller. From there, navigate to the top of the screen to the user profile icon. This icon represents the currently active user account on your console. Selecting it will open a drop-down menu with a variety of options.
Next, scroll down the drop-down menu until you find the “Change User” option. This will take you to a screen displaying all the user accounts currently registered on your console. To switch to a different account, simply select the desired profile and confirm your selection. If you want to create a new account, choose the “Add User” option and follow the prompts to set up a new profile.
Once you have successfully changed or added a user account, you will be able to access the respective user’s games, saves, and settings. Keep in mind that each user account on the Nintendo Switch console is independent, meaning progress and purchases made on one account will not transfer to another. It’s always a good idea to fully understand the implications of switching accounts before making any changes.
By following these simple steps, you can easily change or add user accounts on your Nintendo Switch console. Whether you’re sharing your console with family and friends or simply want to create multiple accounts for yourself, this feature allows for customization and convenience. Explore the various user profiles available and enjoy a personalized gaming experience on your Nintendo Switch.
If you need to change your Nintendo Switch account, whether it’s because you got a new account or you want to switch to a different one, follow these simple steps:
By following these steps, you can easily change your Nintendo Switch account and switch to a different account that is linked to your console. Remember to make sure the new account is properly linked and associated with all the necessary settings and data before making the change.
To change the Nintendo Switch account, you will need to access the account settings on your console. Follow the steps below:
Once you have accessed the account settings, you can proceed with the next steps to change your Nintendo Switch account.
After accessing the Nintendo Switch Home menu, you will see a list of user profile icons displayed on the screen. These icons represent different user accounts that have been created on the console. Use the Joy-Con controllers or the touchscreen to navigate through the profile icons.
If you want to change to a different user profile, scroll through the list and select the desired profile by highlighting it and pressing the A button. The selected profile will be indicated by a checkmark or a colored outline around the icon.
If you don’t see the profile you want to switch to, you can create a new user profile by selecting the “Add User” option, usually located at the bottom of the profile list. Follow the on-screen prompts to set up a new profile.
Remember that each user profile is associated with a separate Nintendo Account, so changing the user profile will also switch the associated Nintendo Account and the saved game data for that profile. Make sure to back up any important data before switching profiles if necessary.
Once you have selected the desired user profile, you can proceed to the next step to access the Nintendo eShop or play games using that profile’s associated account.
Once you have entered your Nintendo Switch, the first step towards changing the accounts is to navigate to the User Settings. To do this, locate the small circle icon with the gear symbol on the home screen. This icon represents the system settings.
Read Also: Who is the Ultimate Fighter in Tekken 3?
Press the A button on your Nintendo Switch controller to open the System Settings menu. This menu contains various options for configuring your Nintendo Switch console.
Using the left analog stick, navigate to the “Users” tab on the left side of the screen. This tab is represented by a silhouette of two people. Pressing the A button will open the Users menu, where you can manage the user profiles and accounts associated with your Nintendo Switch.
Scroll through the user profiles using the left and right buttons on the Joy-Con or Pro Controller. Select the profile that you want to change the account for by highlighting it and pressing the A button. This will bring you to the User Settings for that specific profile.
Within the User Settings menu, you will find the Account Information section. This section displays the current Nintendo Account associated with the selected profile. To change the account, select the “Change” button. A prompt will appear asking if you want to continue with the account change.
Read Also: Do Both Players Need PS Plus to Play Split-Screen?
Confirm the account change by selecting “Yes” on the prompt. This will bring you to the Account Selection screen, where you can choose to link an existing Nintendo Account or create a new one. Follow the on-screen instructions to complete the account changing process.
Once you have accessed the Nintendo eShop on your Nintendo Switch console, it’s time to choose the Nintendo account that you want to use. This step is important because it determines which account’s games and content you will have access to.
If you have multiple Nintendo accounts linked to your console, you will be prompted to select the account you want to use. This can be done by scrolling through the list of accounts displayed on the screen and selecting the desired account.
Keep in mind that each Nintendo account can be associated with different games and save data. So, make sure to choose the account that has the games and progress that you want to access on your console.
Once you have chosen the Nintendo account, you will be redirected to the eShop homepage, where you can browse and purchase games, download updates, and access other Nintendo Switch features.
If you ever want to switch to a different Nintendo account, you can repeat this step and choose a different account from the list. Just keep in mind that switching accounts may affect your access to certain games and content, as they are tied to specific Nintendo accounts.
After you have entered the necessary information and selected your desired account, you will need to confirm the account change on your Nintendo Switch console. This step is crucial to ensure that the account change is accurate and complete.
To confirm the account change, follow these steps:
Once you have completed these steps, your account change will be confirmed, and you will be able to access all the features and benefits associated with the newly selected account on your Nintendo Switch console.
Yes, you can change the Nintendo Switch account you’re using by following a few simple steps. Here’s a step-by-step guide:
To change your Nintendo Switch account, you need to go to the home screen. From there, navigate to the System Settings. Scroll down and select “Users.” Choose the user account you want to change and select “Change.” You can then choose either “Sign In” to use an existing account or “Create New User” to create a new account.
When you change Nintendo Switch accounts, your saved game data will remain on the console. However, you will not be able to access the saved data under the new account unless you transfer it. To transfer your saved data, you can use the Save Data Cloud Backup feature if you have a Nintendo Switch Online membership, or you can manually transfer the data between accounts.
Yes, you can use multiple Nintendo Switch accounts on one console. Each account will have its own game saves, eShop library, and online features. To switch between accounts, go to the home screen, select your user icon in the top left corner, and choose the account you want to use.
Is Blast good in Iceborne? In the world of Monster Hunter: Iceborne, one of the most debated topics among players is the effectiveness of the blast …
Read Article
Will there be a Lost Planet 4? Rumors have been swirling in the gaming community about the possibility of a new installment in the Lost Planet series. …
Read Article
Who killed Moaning Myrtle? In the wizarding world of Harry Potter, there are countless mysteries and enigmas that have captivated readers and fans for …
Read Article
How do you do gourmet Supremos breakthrough thinking? Unlock your culinary potential and embark on a journey of gastronomic greatness with “Gourmet …
Read Article
Is Skyward Harp good Genshin impact? The Skyward Harp is one of the highly coveted 5-star bows in Genshin Impact. This powerful weapon has become …
Read Article
Which hailstone girl has a baby? When a teenage girl from the small town of Hailstone gave birth to a baby boy under mysterious circumstances, the …
Read Article

